
Apple Computers
-
Getting Started with your MacClick the link above to view the Google Document
Getting Started with a Berkshire School Macbook Air

Do you need IT Help?
Remember, an IT Help Desk request can be done in 2 ways:
-
Send an email to ithelpdesk@berkshireschool.org
-
Give us a call 413-229-1803 or internally ext. 1803
BEFORE YOU GET YOUR COMPUTER: 2
Moving to Mac from a Berkshire School PC 2
AFTER YOU GET YOUR COMPUTER: 2
Can I sign in to my personal Apple ID? 5
Can I decorate/ personalize my school computer? 6
Adding and Setting Up School Printers 6
Opening Apps/ Finding Your Files 12
How do I take a Screenshot? 13
Advanced Printer Settings (i.e. Stapling, Hole Punching, Double Sided Printing) 15
BEFORE YOU GET YOUR COMPUTER:
Moving to Mac from a Berkshire School PC
***Back up everything you might need from your Berkshire School PC. We suggest saving your important documents and files to your Berkshire School Google Drive.***
AFTER YOU GET YOUR COMPUTER:
Initial Set Up Instructions
On your new Berkshire School Mac:
-
Sign in using your Berkshire School account (same username and password as your email/ SSO)
When you sign in for the first time, there is some quick configuration:
-
On the Global Protect pop up, click get started.

-
Enter the domain: rax2.bsn.net
-
Enter your username (the part of your email BEFORE @berkshireschool.org) and password
-
Turn on Microsoft auto update. You can just click okay for the required data notice.

-
Connect to the BearsEmployee WiFi network.
-
Go to the Apple Menu and open “System Settings”, and then select “Wi-Fi”
-

-
Select the “BearsEmployee” network.
-
Enter your username (everything before the @ sign in your email address).
-
Enter your password and connect.
-
Open Chrome and sign in to your Berkshire School Google Account.
As we are a Google School, we suggest using Chrome for maximum compatibility with all things Google.
-
Open “Chrome”
-
The first time you open Chrome, it will ask you if you want to set Chrome as your default browser. We suggest leaving this box checked yes.
-
Sign in to Google on Chrome with your Berkshire School email address.
-
Follow the setup directions. We recommend turning on syncing.
-
This would also be a good time to set up your bookmarks. Bookmark any sites that you use frequently. You will notice a folder with school bookmarks (Veracross, Google Drive, etc.) already on your bookmarks bar. As the year goes on, we will update this with other recommended websites and apps.
-
Pin Chrome to “Keep in Dock”
-
Optional: Remove Safari and any other unused apps from your Dock. This is not the same thing as uninstalling, you can still open it later if you need to.
-
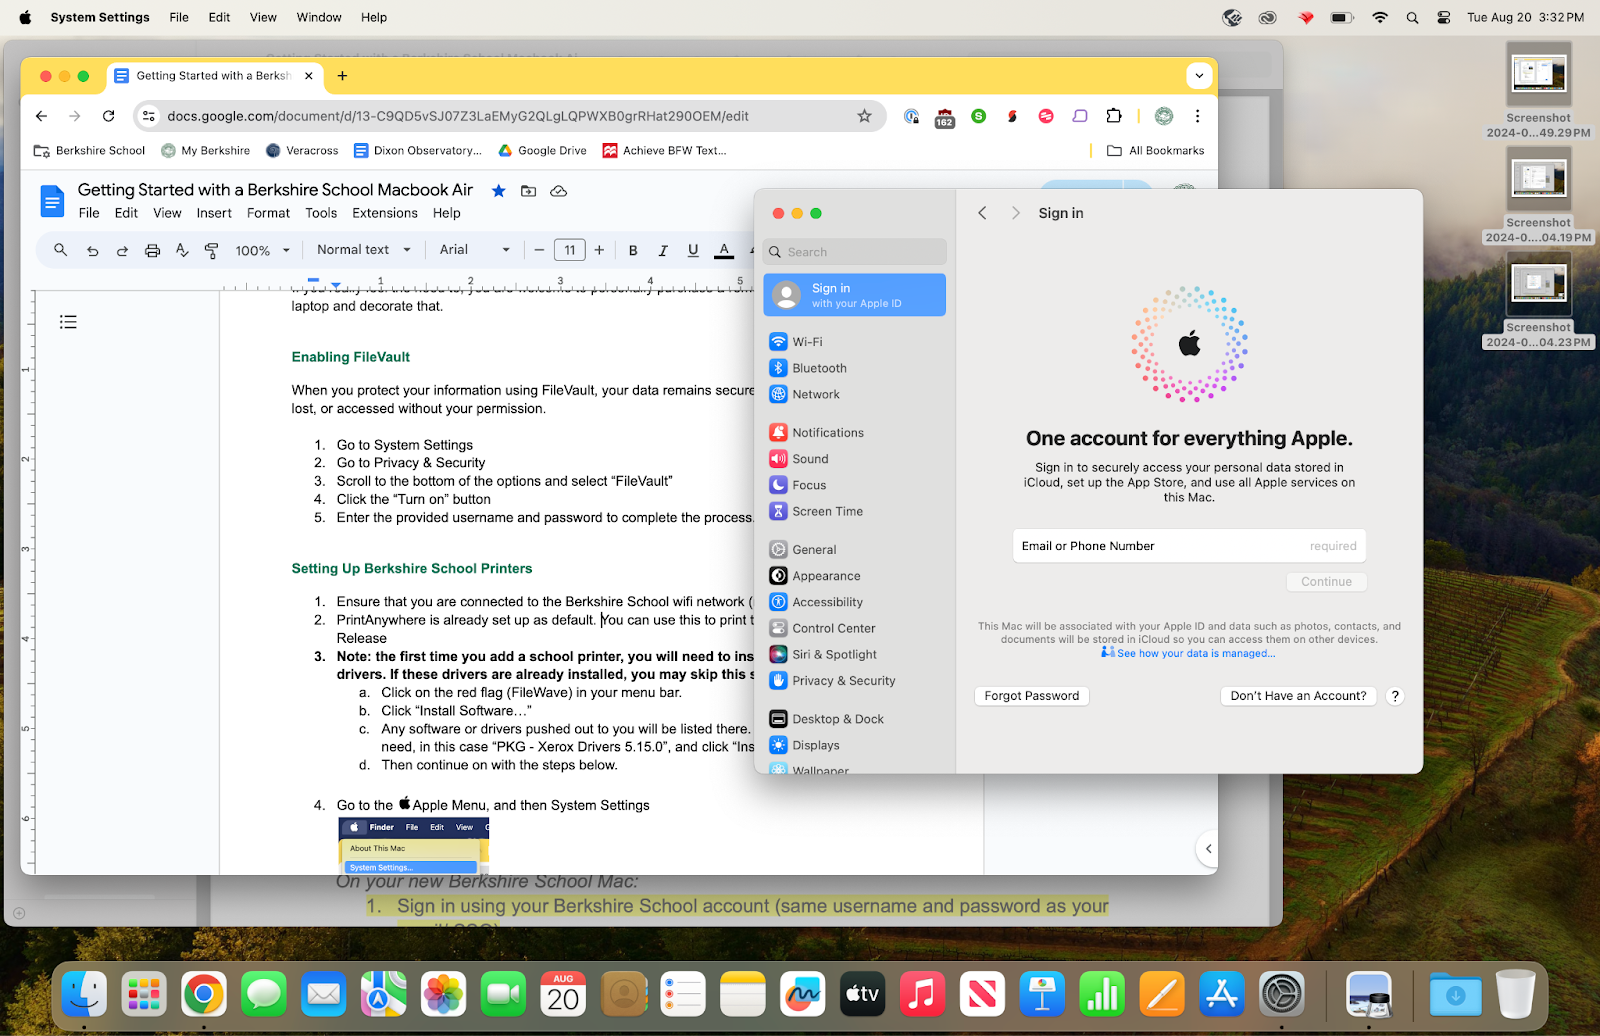
Sign in to your school issued Apple ID.
-
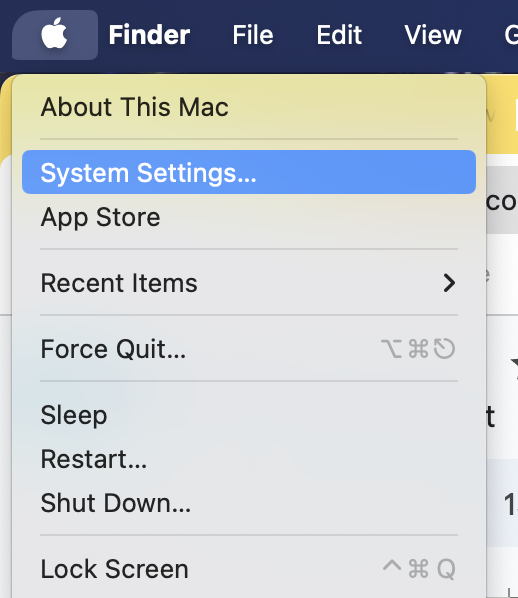
Go to the Apple Menu
and open “System Settings”. Then the first option, “Sign In with your Apple ID”
-
-
Optional: Set up Touch ID (Fingerprint authentication for faster sign on)
-
Enable FileVault.
When you protect your information using FileVault, your data remains secure if your Mac is stolen, lost, or accessed without your permission.
-
Go to System Settings
-
Go to Privacy & Security
-
Scroll to the bottom of the options and select “FileVault”
-
Click the “Turn on” button
-
Enter your Berkshire School computer username and password to complete the process.
-
Sign into Microsoft Office.
Microsoft Office
Microsoft Office, including Word, Powerpoint, and Excel are installed by default. Note that the first time you open a Microsoft Office application, you will need to sign in.
-
Add any school printers that you need access to [See detailed guide below]
Software Installation
Microsoft Office, Microsoft Teams, Zoom, iMovie are all installed by default on school-issued Macbook Air computers.
Adobe Creative Cloud
The Adobe Creative Cloud installer is installed by default. The school has licenses for Creative Cloud apps that can be assigned to you upon request. Please send in a helpdesk ticket if you need access.
If you need additional software installed, on your school - issued computer:
1 - For software already in use/ previously vetted (i.e. Microsoft Office, Adobe Creative Cloud, etc.), please send a helpdesk ticket to ithelpdesk@berkshireschool.org
2 - For new software that has not yet been vetted by the IT team, please go to this link and fill in the form completely. Someone from the IT team will reach out to you with instructions on how to proceed.
Can I sign in to my personal Apple ID?
No, you should instead use your Berkshire School Apple ID.
Can I decorate/ personalize my school computer?
You can change the desktop background however you see fit (using good judgment), however, you may not customize the exterior of your equipment. This means no stickers, writing/drawing on it, or removing inventory labels. Your assigned laptop may not be yours forever, others may not appreciate your aesthetic and removing stickers is time consuming and can cause scratches to the device.
If you really feel the need to, you are welcome to personally purchase a removable case for your laptop and decorate that.
Adding and Setting Up School Printers
-
Ensure that you are connected to the Berkshire School wifi network (not Residence).
-
PrintAnywhere is already set up as default. You can use this to print to any Xerox printer. Release using the QR code or your Faculty ID.
-
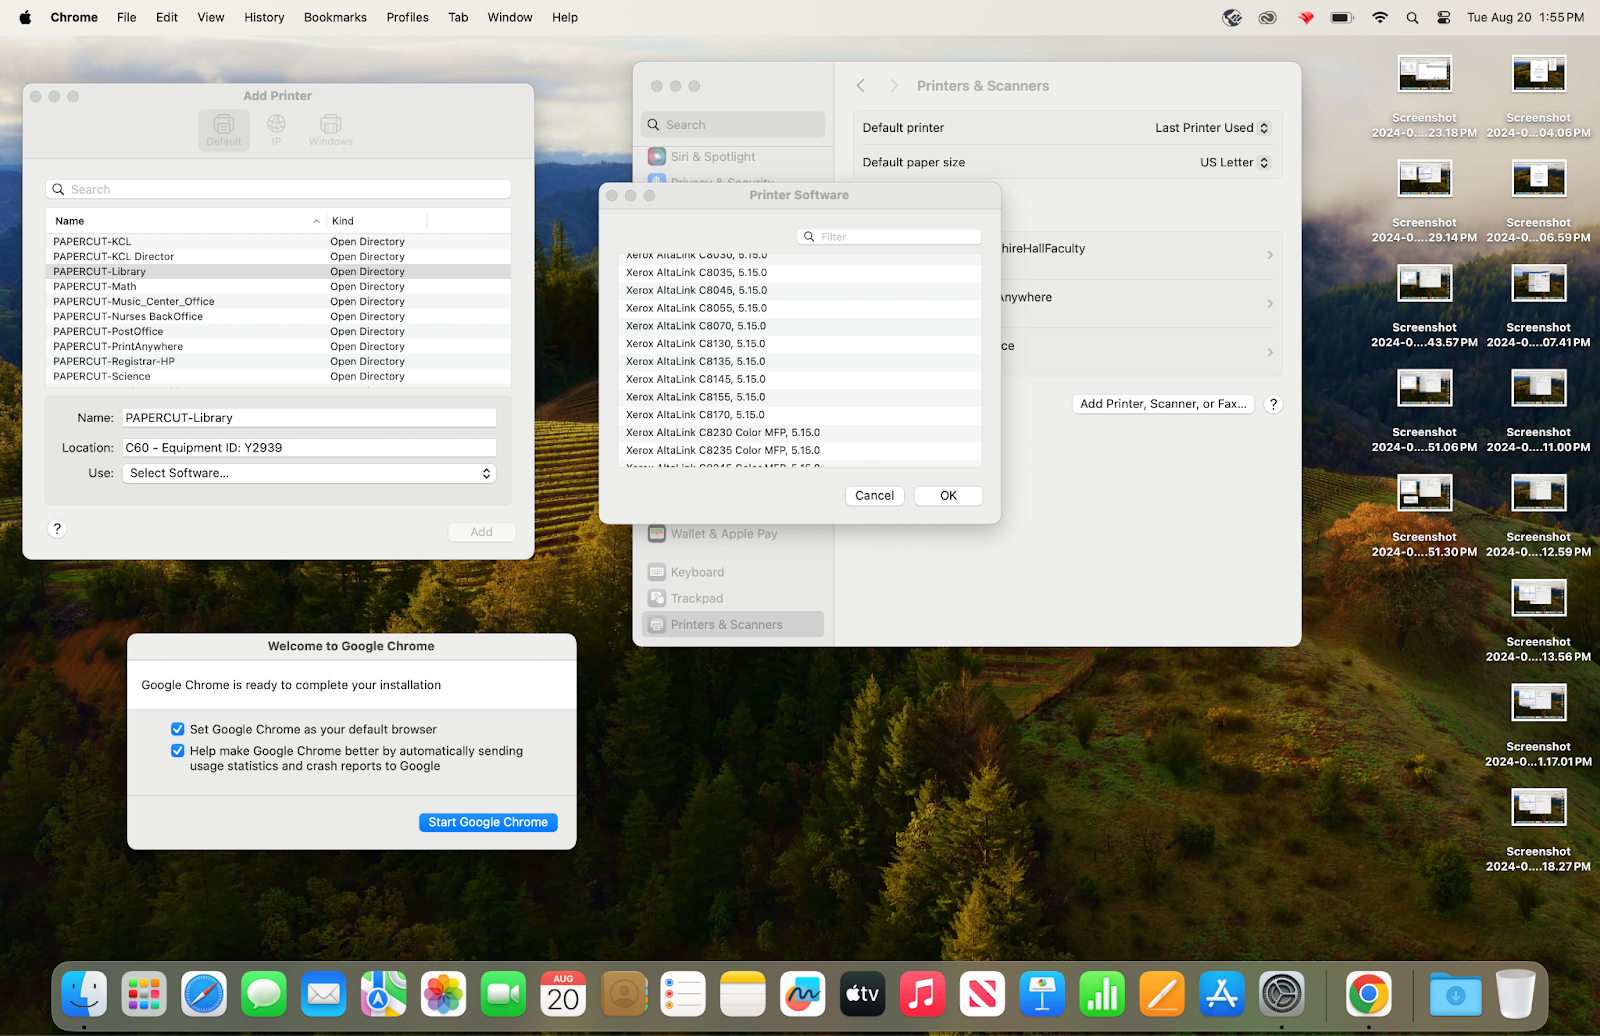
Note: the first time you add a school printer, you will need to install the Xerox print drivers. If these drivers are already installed, you may skip this step.
-
Click on the red flag (FileWave) in your menu bar.
-
Click “Install Software…”
-
Any software or drivers pushed out to you will be listed there. Select the software you need, in this case “PKG - Xerox Drivers 5.15.0”, and click “Install”
-
Then continue on with the steps below.
-
-
Go to the
-
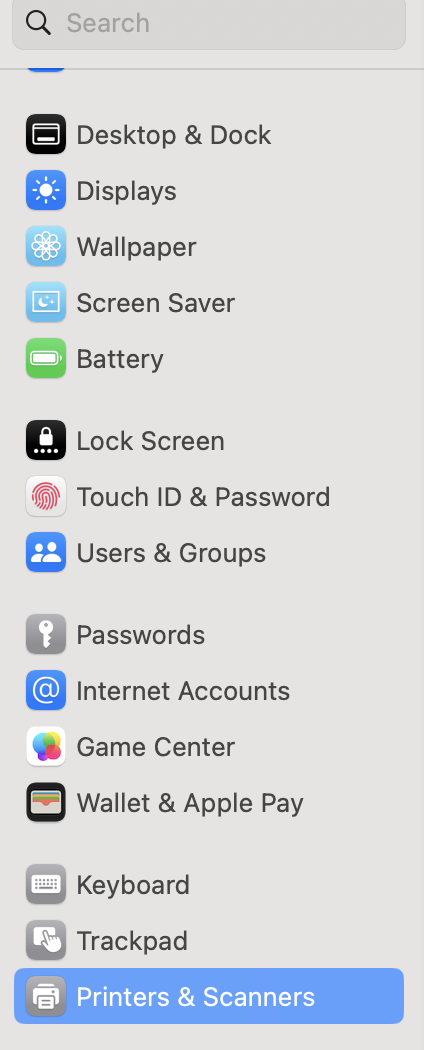
Select Printers & Scanners
-
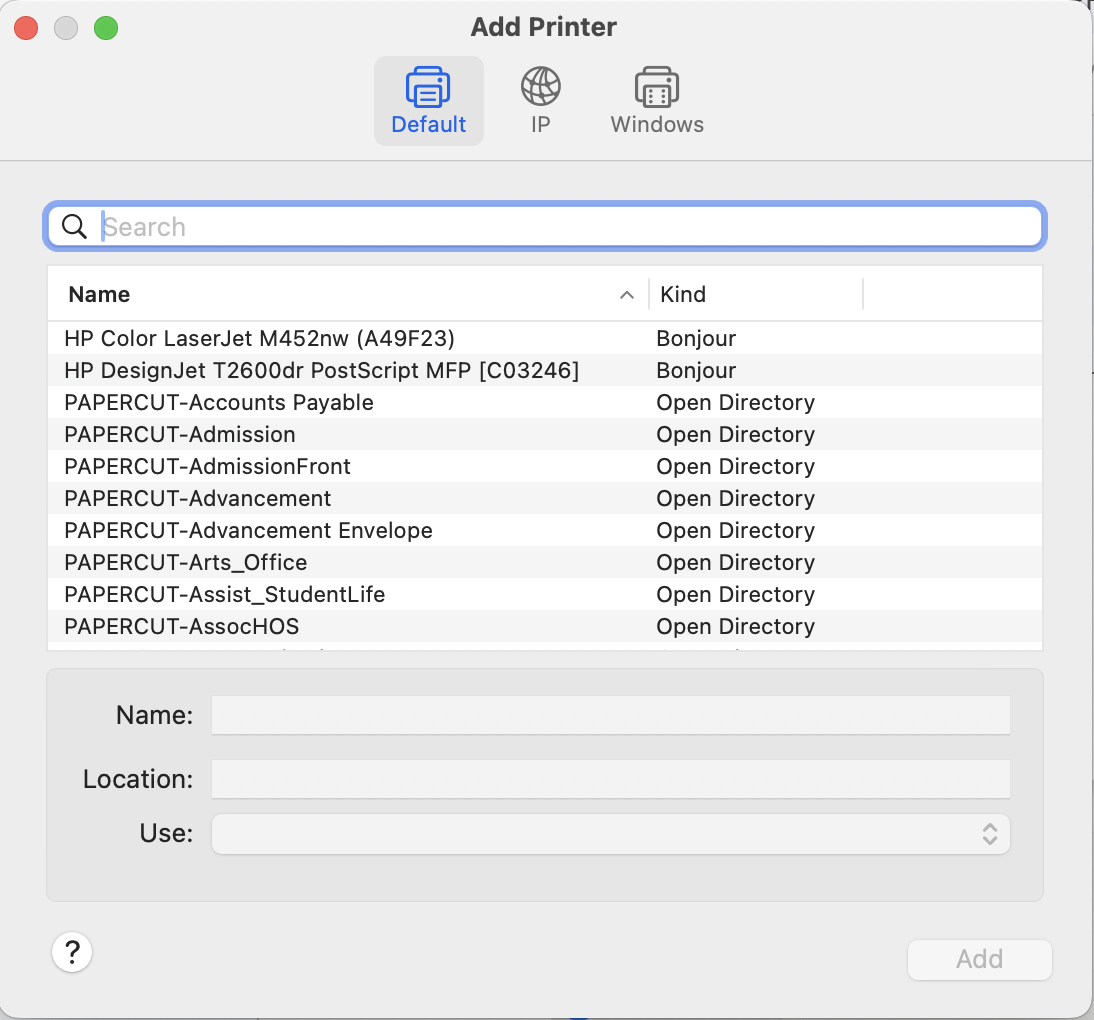
Select “Add Printer, Scanner, or Fax…”
-
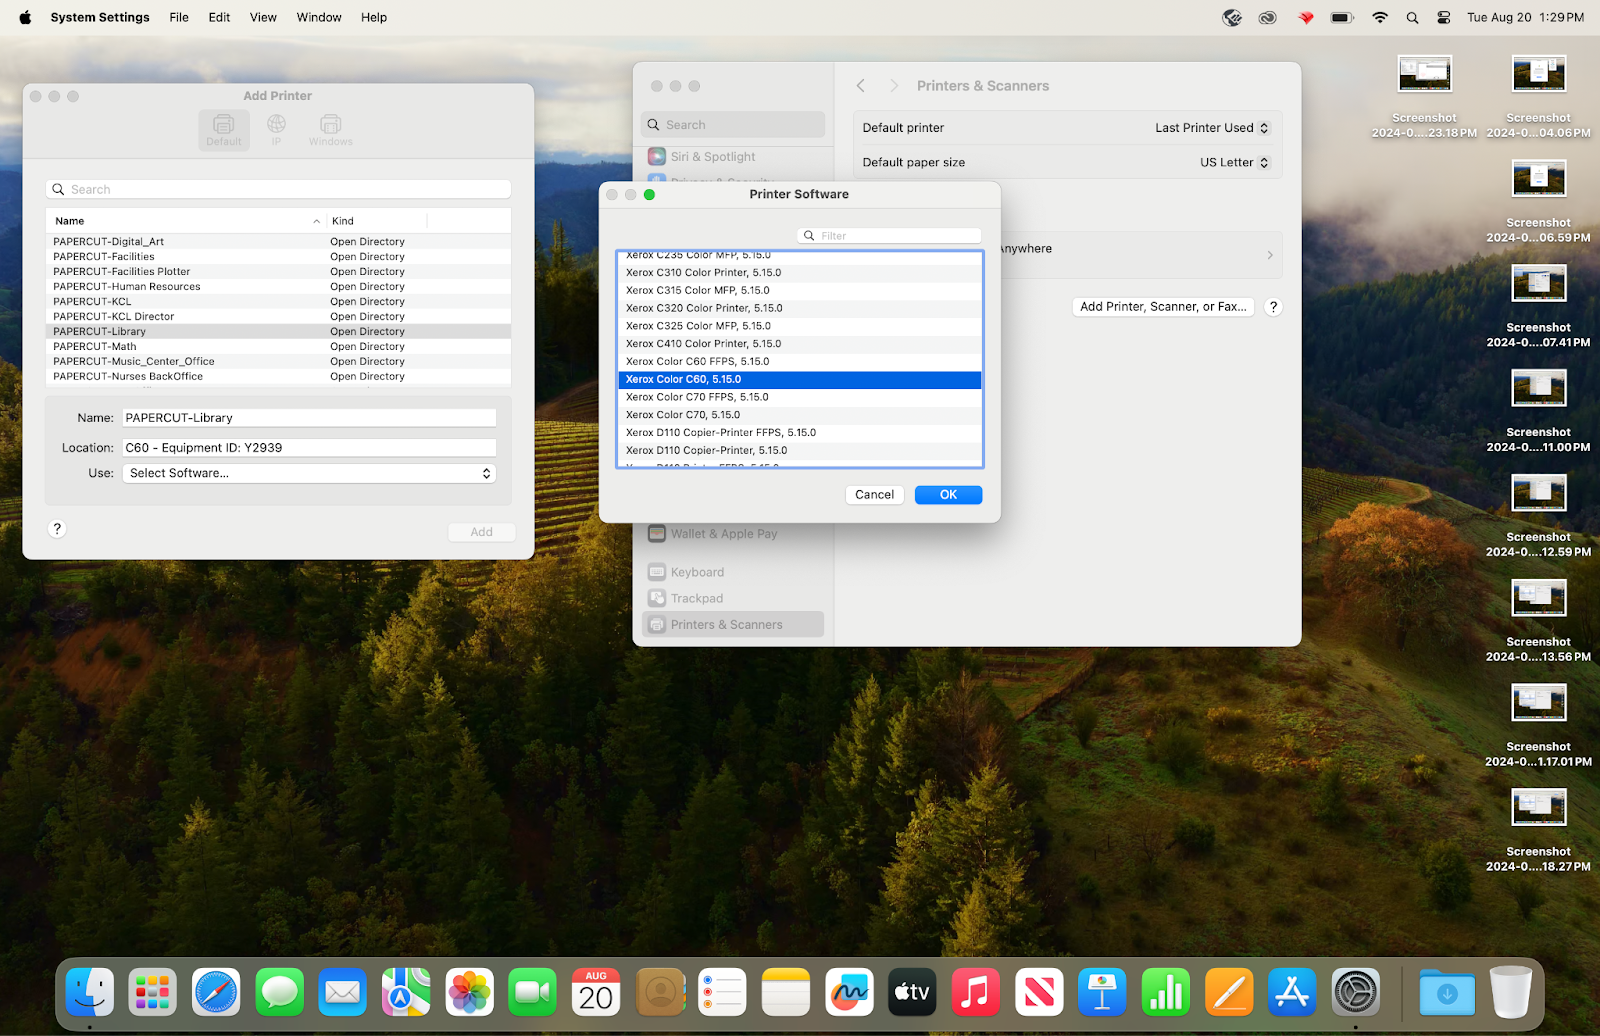
Choose the printer that you want to add. For example, you would select PAPERCUT-BerkshireHallFaculty for the printer in the Great Room, PAPERCUT-Science for the science office in MBD, or PAPERCUT-Library for the library printer.
-
Find the department printer you wish to connect to, then from the “Use” menu (Choose a driver) select the option to “Select Software”.
-
Most printers will use “Xerox AltaLink C8045”, with the exception of BerkshireHall108b (Xerox PrimeLink C9065), the Library printer (Xerox Color C60) or office printers.
-
After selecting the driver, click “Add”.
-
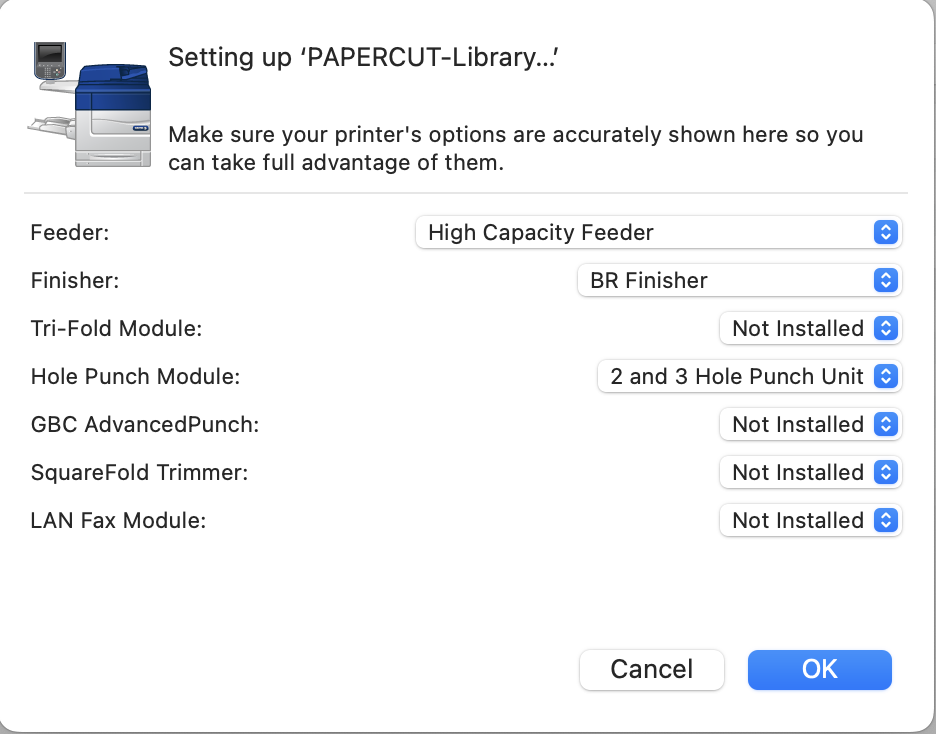
On the next screen set the default print settings that correspond to the printer you are adding. Note that if these settings are incorrect, you will not be able to use advanced functions on the printer, such as stapling.
Xerox AltaLink C8045 [Most printers except the Library, BerkshireHall108b, and personal office printers]
**Most printers will set the finisher to: Office Finisher LX.

Xerox AltaLink C8045 [Science Office, Math Office]
**For the Math/Science office printers, set the finisher to: Office Finisher LX, and set Hole Punch Module to “2 and 3 Hole Punch Unit”.
Xerox Color C60 [Library]
**For the library printer, set the finisher to: BR Finisher, set Hole Punch Module to “2 and 3 Hole Punch Unit”, and set feeder to: High Capacity Feeder.
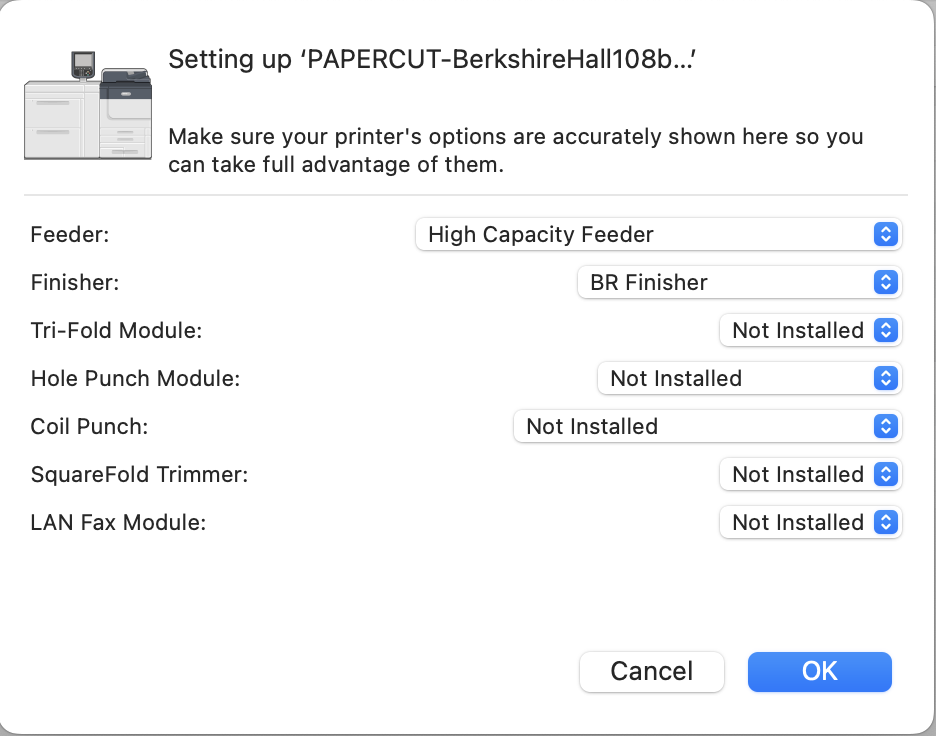
PrimeLink C9065 [BerkshireHall108b]
**For the BerkshireHall108b printer, set the feeder to: High Capacity Feeder and finisher to BR Finisher.
USING YOUR MAC:
New to Mac?
See these helpful quick start guides from Apple:
Getting Started with Mac and Just switched from Windows to Mac?
Opening Apps/ Finding Your Files
-
There are several ways to open an app on the Mac.
-
In your dock, the Launchpad icon (colorful grid) will show a list of all apps that you have installed.
-

-
Dock - We suggest customizing your dock to include apps that you use most frequently.
-
The keyboard shortcut ⌘ Command - Space opens Spotlight, a quick way to search the computer for a file or App
Mac Keyboard Shortcuts
-
Ctrl key - The Mac Control key is not the equivalent of the PC Ctrl key. The Mac Control key is primarily for helping you “right click” things. Instead, the Mac equivalent of the Windows Ctrl key is the ⌘ (command) key. It’s right next to the space bar.
-
Most Windows Ctrl key shortcuts correspond perfectly to ⌘ - key shortcuts on the Mac. For example, Cut is ⌘ - X instead of Ctrl+X, etc. Here are some of the most common Mac keyboard shortcuts.
|
Shortcut |
Action |
|
⌘ Command - C |
Copy |
|
⌘ Command - X |
Cut |
|
⌘ Command - V |
Paste |
|
⌘ Command - Z |
Undo |
|
⌘ Command - A |
Select all |
|
⌘ Command - F |
Finds specific text within a document or open window |
|
⌘ Command - P |
|
|
⌘ Command - S |
Save |
|
⌘ Command - Space |
Spotlight, a quick way to search the computer for a file or App |
How do I take a Screenshot?
Shift - Command - 3 (This will capture the entire screen. The screenshot is automatically saved to the desktop.)
Shift - Command - 4 (This will allow you to select what to capture by clicking and dragging. The screenshot is automatically saved to the desktop.)
Connecting to a projector
The MacBook Air computers can be connected to a projector using the same USB-C cable plugged into the media hub in all classrooms. This will also charge the computer.
The MacBook should detect the projector automatically. If it doesn't, go to the Apple Menu
-
“Mirror Displays” for identical content on both screens
-
“Extended Desktop” for different content on each screen (using the projector like a second screen)
What if sound isn’t working when I connect the projector, or if the sound is only coming from my laptop?
With the projector connected, go to the
Printing
Once you have set up access to printers as per the instructions above, you should be able to print normally. On a Mac, this typically means using the Menu bar and then File > Print; or with the shortcut ⌘ Command - P
Remember:
-
Using PrintAnywhere is more secure, as your prints will not come out until you release them at the copier.
-
Double sided printing saves paper. Whenever possible, print double-sided for a more eco-friendly option.
-
Black and White printing is exponentially less expensive than color printing, so please be mindful of what needs to be printed in color.
Printing from Chrome
If a printer that you have installed is not showing, click on “See More”.
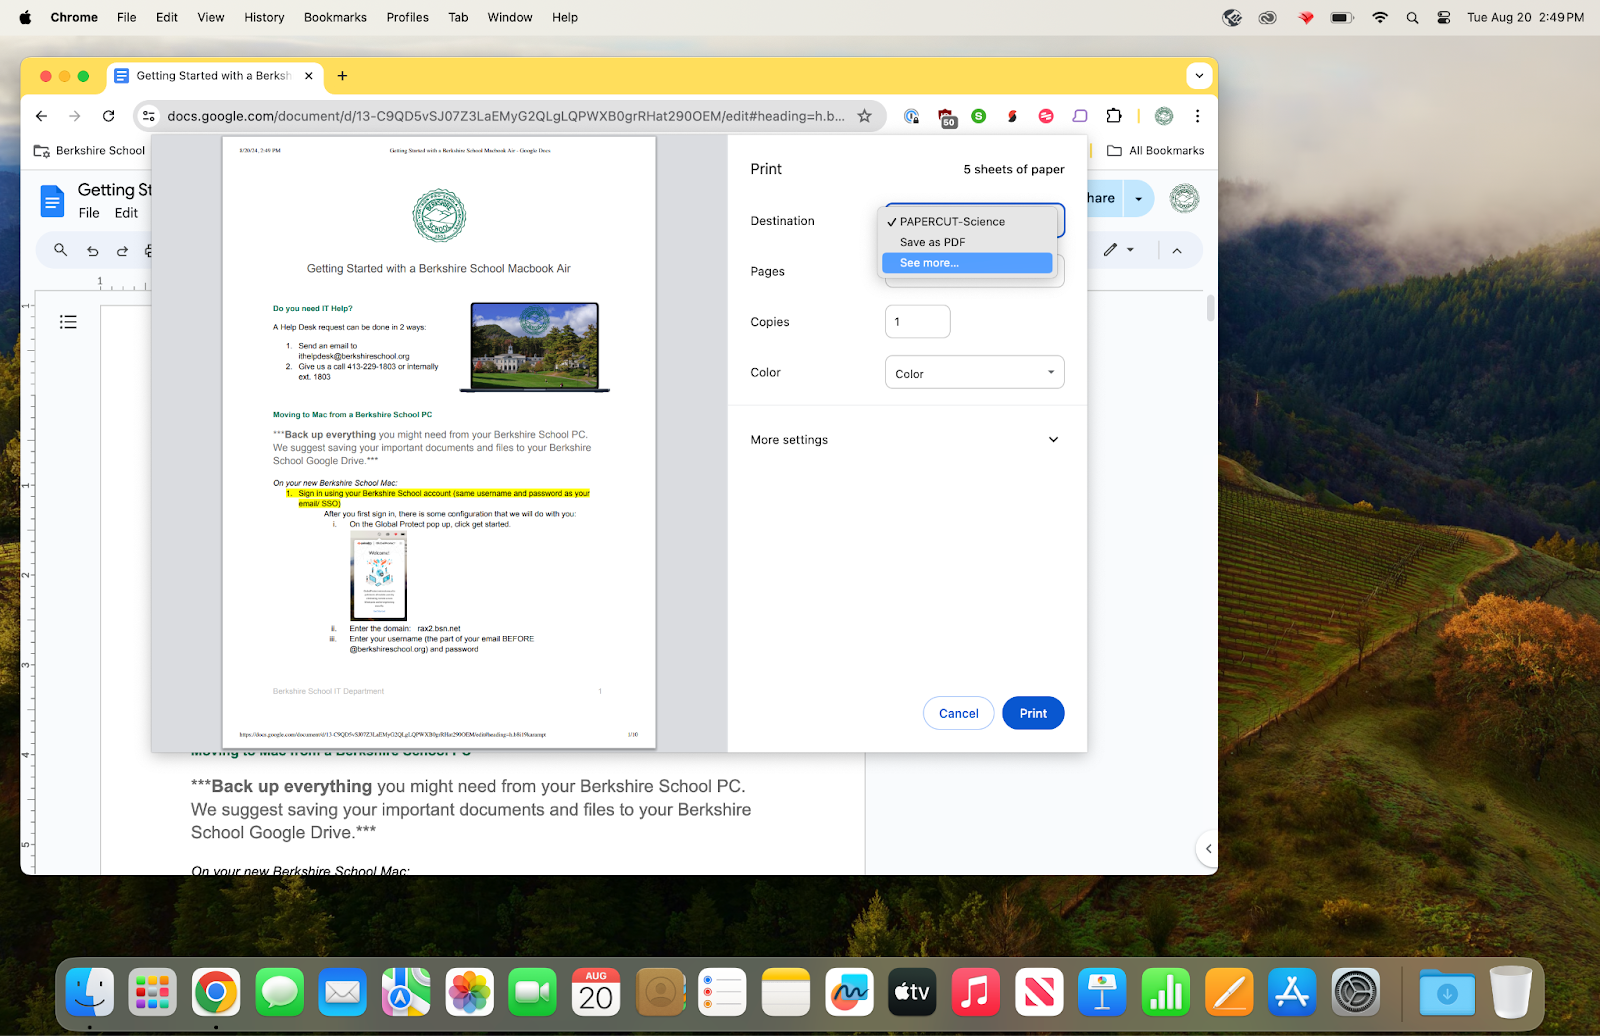
When printing from Chrome, if you would like more advanced features such as stapling, click on “More Settings” and then “Print using system dialog”
Advanced Printer Settings (i.e. Stapling, Hole Punching, Double Sided Printing)
If printing from Chrome, select “Print using the system dialog.”
If printing from other applications, this screen should come up automatically when you go to print.
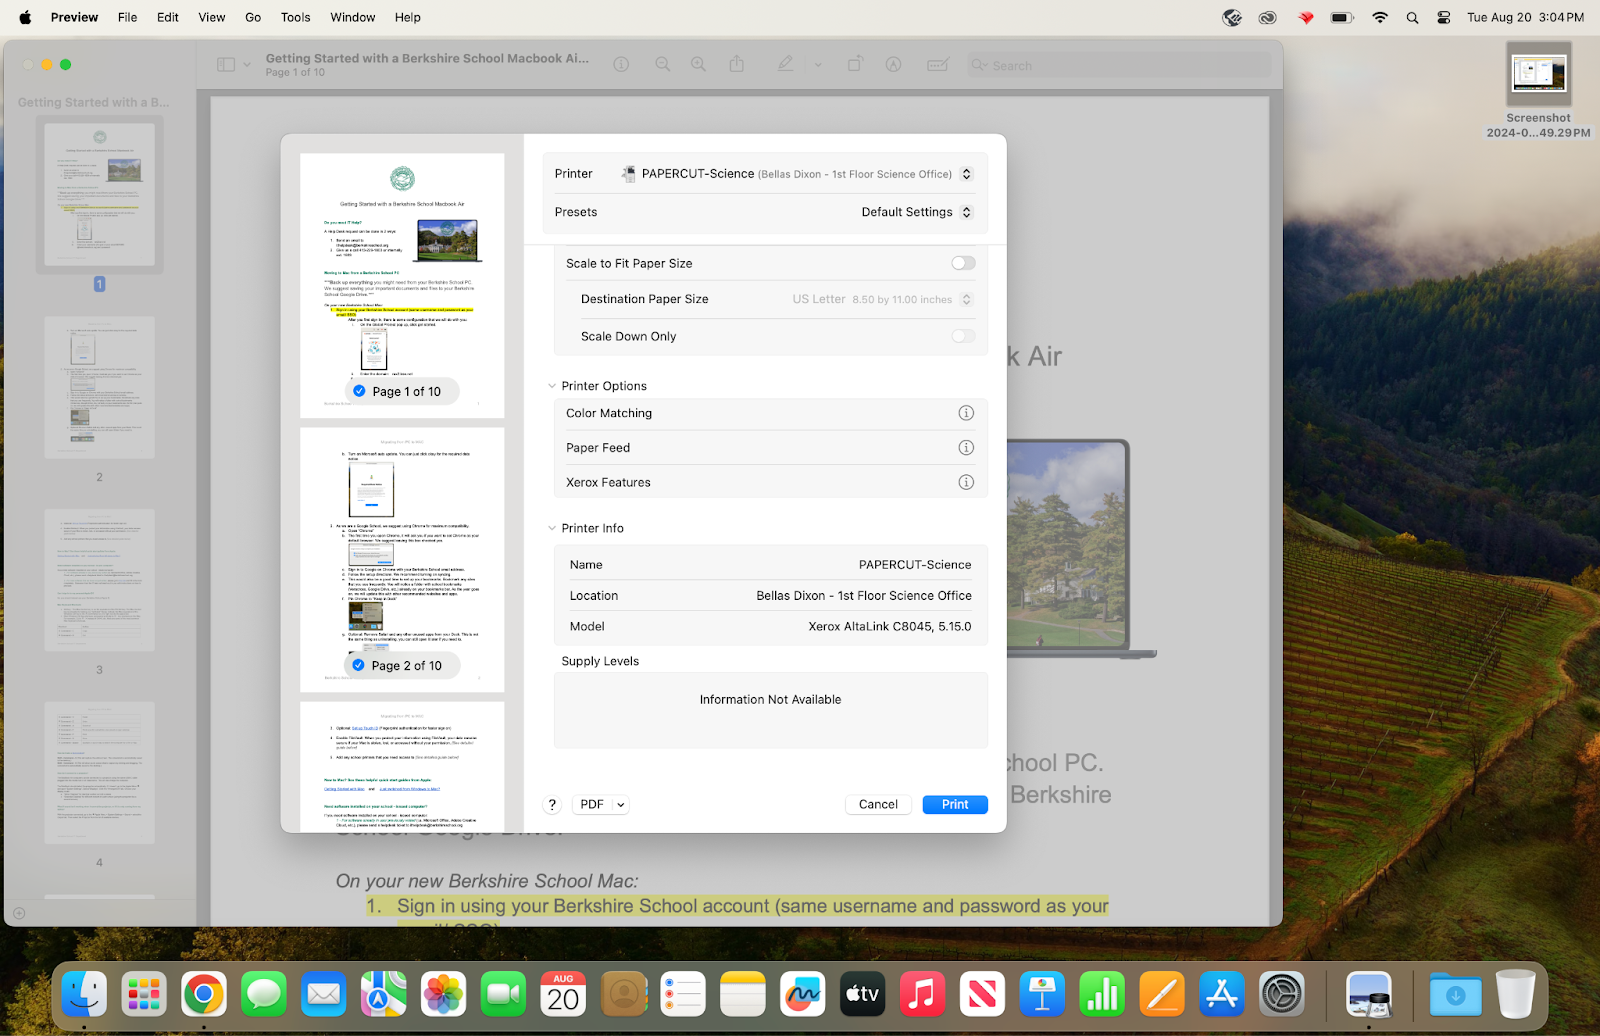
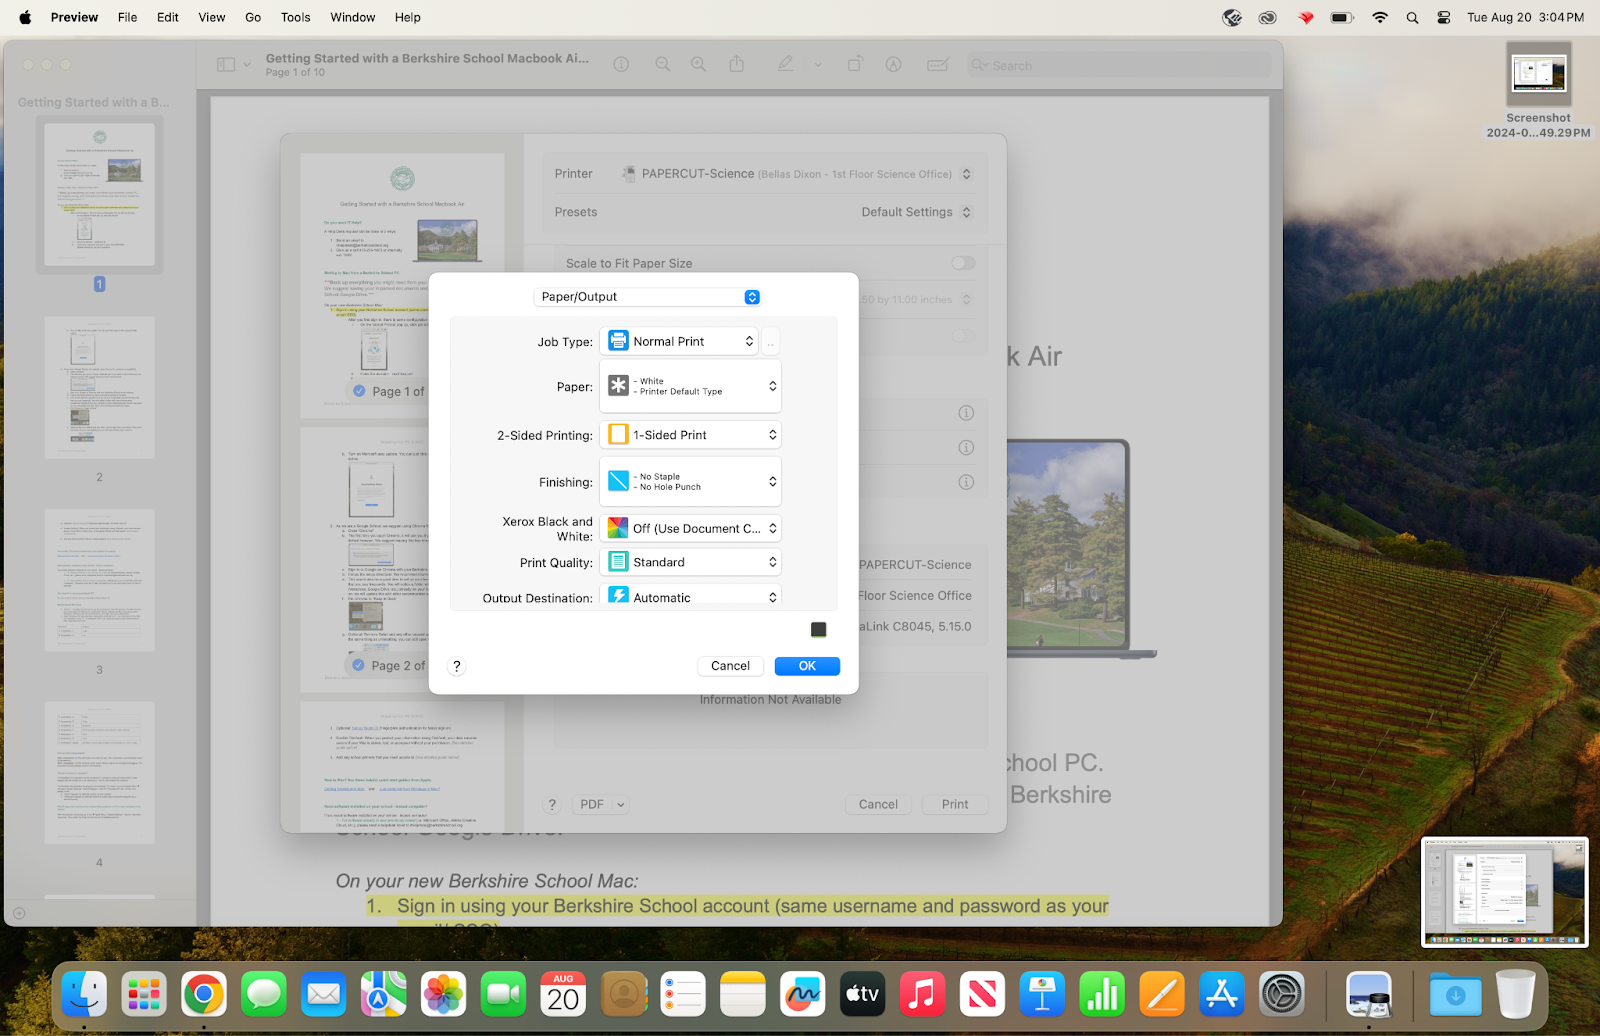
Go down to “printer options”, and select “Xerox Features”. This is where you can turn on double sided printing, stapling, double sided printing, hole punching, etc.
Have any additional questions?
Send an IT Help Desk ticket by emailing ithelpdesk@berkshireschool.org
or give us a call 413-229-1803/ internally ext. 1803